Thursday, 5 March 2020

Making a teddy bear, the process

Have you ever wondered how a teddy bear is made?  Each artist bear maker develops their their own methods through trial and tribulations, so a few months ago, I decided to create a bear in 'real time' and photograph his progress, step by step to show you how I create my bears. 

This is the story of how 22" Caspian was created.


He was pre-sewn yesterday.

This morning: head stuffed, ears and eyes positioned and pinned, nose area trimmed, half of muzzle trimmed. Now it's time for lunch! 


Nose stitched.
 

Mouth stitched and left half of muzzle finely trimmed.


Remainder of muzzle finely trimmed.


Eyes next ... but first it's time for a coffee break!
 Eyes inserted but eye area needs a trim so he can see where he's going!


That's better ... eye sockets trimmed to show off his baby blues.


 A little shading to make the eyes really 'pop'.


A little more muzzle trimming and hey presto, one teddy bear head ready for its body!

It's 4pm, so there's still time to joint his head to his body and perhaps stuff the arms and legs before I have to cook dinner. 
 

 Now he has a body ...


... and a pile of half stuffed limbs!


 Measuring where the arms should be placed.


 Arms attached. He's starting to look more like a proper bear now!


 Arms and legs attached.


 Unstuffed - this bear needs a substantial meal!


 Get stuffed bear!


 Well, I think that's my lot for today. It's time to cook the evening meal before my family comes home from work and it's too dark to take any more photos.

Everything is attached and bear's tummy is full, he even has a growler. His arms and legs will have to wait until the morning for final stuffing (they are only half stuffed at the moment) and I think I'll fiddle with the ears tomorrow too because I'm not sure about their position at the moment. So, if all goes well, he'll have his ears sewn on, stitched claws and a waxed nose by tomorrow afternoon.

A good day's work so far ... this has been fun!
 

 Day 2 and here we go again!
First, bear needs to have his back seam closed. Ladder stitching does the job beautifully.
 

 See, now he has an invisible back seam!


 Bottoms up bear, it's time to stuff the top half of your legs ...


 Sitting pretty! Legs stuffed, arms next ..


 One arm stuffed, the other one still to finish ... and those ears!


 Arms finished but his ears are really bugging me now!


 Not quite the look I was aiming for ...


 Howsabout placing them slightly lower ...


 ... like this? Nah, too cutsie for this ol' growler!


 Isn't this where they were to start with?! Well, maybe not quite ... they do suit him better a little higher though.


Right, time to make the final decision and sew those ears on.


 That's better! A tiny bit more trimming into the top of the muzzle area and with a little gentle sprucing up he's almost finished ...


 Come on bear, give us a twirl!


Lovely profile ...


Yes, this side is lovely too!


Hey, you're a handsome chap ... but ooops, I haven't sewn your claws on yet! Better do that next - and get that nose waxed.

We're almost there ...

Back later - yes, it's teabreak time! I'm going to put the kettle on now!
 

 Now to wax his nose.  Waiting patiently while the wax melts ...


 First coat of beeswax ... yuk, snotty!


Initial buffing for first coat ... looks okay, but hopefully will be even better after the second coat.


Second snotty! Poor ol' bear! Atishoo!


But all that ucky snottyness was worth the effort, now bear has a smart shiny nose and yes, that's him, sat by my computer screen admiring his work in progress photographs as I type!

We're not quite finished though, I still have his claws to stitch, but Fo's due here for her cup of tea soon, so I may have to do that a little later.

Finally I'll have to decide whether to trim him, or leave him bare ... hmmmn .... what do you think?

And then tomorrow he can have his posh pics taken on my posh Canon camera ...
 

Almost teatime on Day 2 and bear's claws are now underway!


He's a classic bear, so I've given him simple stitched claws ... very neat!


  Is it time for my trim yet Mum? Look all my claws are stitched now ...


A ribbon bow? Really? Are you sure about this? Yes bear, I am sure. It suits your baby blue eyes!


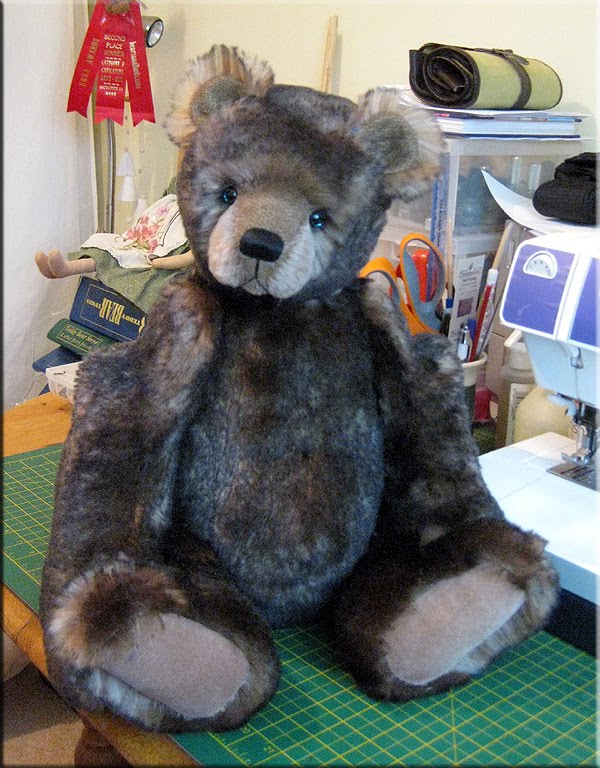
And finally, after many practise shots, a lovely professional photograph of my finished bear.  
All in all, he took about three days to finish. 

Teddy Bear Books

I'm always on the lookout for good bear-crafting books to share with you and found this book quite by chance a couple of weeks ago.  It was first published in 1998, so you may have to hunt to find it and be warned, it can be on the pricey side ( my copy was about £30 on Amazon) but for anyone wanting a good solid teddy bear making reference book full of detailed instructions and with plenty of helpful photographs, this book really is a useful purchase.

The Complete Book of Teddy-Bear Making Techniques
by Alicia Merrett & Ann Stephens

The book covers in detail everything from how to design your own jointed teddy bear pattern, through to making a classic bear - in fact, it explains all aspects of traditional bear-making from cutting out, to sewing limbs, 
jointing, assembling fitting eyes and even sewing on those fiddly ears!  It also covers making clothes for your bear and the techniques required for making miniature bears.  As the icing on the cake, there's a lovely gallery of artist bears featured in the last chapter, giving you an opportunity to enjoy the original bear art being created back in the 1990's! 

Definitely a great book for anyone who likes to collect bear-making books and a most useful book for anyone who would like to learn how to make their very own teddy bear!

What exactly is an artist bear?


I love finding time to meander through the annals of teddy bear history and to stroll along my personal teddy bear 'Memory Lane'.  Sunday afternoon was absolutely glorious, so I tucked myself under the sun parasol with a cool drink to hand and a stack of teddy bear publications to browse.

  Sadly, the 'Hugglets Teddy Bear Magazine' is no longer published.

The question 'What is an Artist Bear' has been hotly debated by 'teddy bear artists', for as long as I can remember - probably since the term was first coined in the US, back in the 1970's.  The topic still raises its controversial head with regular monotony some forty years later, with bear makers/designers/artists becoming hot under the collar as they staunchly defend their own interpretations.  In case you are curious, I am a bear 'artist' who much prefers to call herself a teddy bear 'designer' when pushed to define what I do, simply because this definition sits most comfortably with me, given that my drawing skills are on a par with those of the average four year old ...


So, after a rather magnificent heap of 'bruhaha' (a wonderful term I have recently coined from a bear artist friend!) among teddy bear 'artists' in response to a recently published magazine article on this subject, I had to smile when I opened a magazine binder yesterday and came across an old Hugglets magazine dating back to Summer 1993 ... eighteen long bear-making summers ago. Back then, I was still dreaming about launching myself into the magical world of teddy bear artistry as a bona fide 'bear artist', so on a hot summer's day yesterday, I must admit page 21, titled 'What is an Artist Bear,' made me smile. The first definition had been thoughtfully provided by the lovely lady who was kind enough to give me my first leg into the bear business way back in 1994 -  Michelle Chambers of the Rochester Teddy Bear Shop stated, "For a bear to come under the category of an Artist Bear, it should not be mass produced, but created in a cottage industry environment.  The bear artist is also someone who can turn bear making into a fine art, so that An Artist Bear is a bear with individuality and, most importantly, it has a unique style".

  1993 feature, 'What is an Artist Bear?'

Reading further on, Janet Clark of Teddystyle, a leading light in our world of teddy bear artistry, agreed by saying, "I don't even know that I'm an artist myself, that's up to other people to say .... a good bear maker can put a good face on a bear, but an artist can make that face come to life".  Maddie Janes, another well respected bear maker of that era, went on to say, "If you're a real teddy bear artist, you don't just have one pattern you keep making in different sizes ... you're making new patterns all the time and using new components."


A 'Chiltern Memory' created for me by Pam Howells in the early 90's

UK teddy bear royalty Pamela Ann Howells, chief designer for the Chiltern Toy Company for a decade from the 50's onwards and still creating today, fifty years later, under her own 'Bears that are Special' label, said: "There's just as much thought goes into the designing of a manufactured bear, even if it is mass produced in the end.  The term 'artist bear' is a new phrase really.  I've always considered myself to be a designer and maker.  I know a lot of people feel that a bear is their way of putting their art down, but I don't look at bears that way .... As long as the bear is nice when it's finished, I don't think it matters."
Well, if it's good enough for Pam, it's certainly good enough for me!

The Chiltern Hygenic Toy Company  (can you spot my artist bear Chiltern Memory, among his manufactured friends?)
Manufactured 'Hugmees' 1930 - 1950

And so it seems to me, definitions don't really belong with teddy bears.  After all, a much-loved teddy will appeal to his owner for any number of reasons, least of which is likely to be whether he has been defined as 'art' or not.  In my view, it's best we bear 'crafters' climb down from our high horses and concentrate our energies on creating bears from the heart, taking care not to slip into the murky waters of the ego trap. 


I would like to give the last word to Gregory Gyllenship, one of our finest UK and international teddy bear artists ...

  Gregory, a modest man, defines himself as:
'A bloke who makes bears.'

Well said Gregory!

The process of making a teddy bear

 Making a traditional teddy bear is a very involved process...


Even a fairly straightforward classic teddy bear takes about twelve solid hours to create - from drawing and cutting out the pattern, trimming the mohair edges by hand to give a professional finish, then pinning the pieces together ready for sewing, setting in paws, stuffing, making the head, assembling, jointing and finishing. 


So I'd share my latest bear's work-in-progress photos to show the process. The picture above shows a stuffed head with muzzle closely trimmed on top.


I usually pin the ears roughly in place at this point and use a couple of black pins to give me an idea of where to place the eyes. Then I start to scissor sculpt the rest of the muzzle.


I always work on the head first and when I'm happy with the muzzle, move on to nose embroidery.


Once the nose and mouth are sewn, I think the bear really starts to take on his personality!


But as you can see, it's only when the eyes (vintage boot buttons in this case) are inserted, he comes to life ...


When both eyes are in place and he can look straight at me, my teddy bear is ready to be assembled.


After I have jointed the head to the body, I half stuff his limbs and measure where I want to fix them.


When making a traditional bear, the traditional method of jointing limbs and head is to use two hardboard discs, one inside the body cavity and the other in the limb, then make a crown joint using a cotter pin and washers to secure.


When teddy has been assembled, it's time to stuff him, add his growler and close all seams by hand.


Lastly, there are claws to be stitched and ears to be sewn on; again by hand.


To finish teddy, I like to give him a thorough brush with a teasel brush to remove any fur trapped in the seams and generally spruce him up before deciding how to accessorize.  As this is a traditional teddy, I opted for a smart satin bow.


Before teddy can be offered for adoption, I like him to have studio photographs taken for my website as it's important to represent the colour of his mohair as accurately as possible and the Iphone pics snapped in my workshop aren't really suitable ... and of course, a beautiful photograph taken on a decent camera is hopefully worth a thousand words!


So that's the tale of how one of my traditional teddy bears is made!


It really is a case of taking the process a step at a time, allowing yourself plenty of time to enjoy bringing your special bear to life.